
Mortar Pro Pawn
To use Mortar Pro Pawn with assets provided by the plugin itself following steps have to be done -
- Drag and Drop MortarProPawns Blueprint into level.
- Assign Team ID to pawns. Mortars having 0 as team id is neutral, opposite team id is enemy, same is friend. Team ID is accessed by MortarProTeamComponent
That's it : ) you will see mortar pawn attacking each other.
Feature Walkthrough
Necessary Components
1. Static Mesh Components
A MortarProPawn has 3 levels of the hierarchy of Static Meshes
- Mortar Pro Base - It is the immovable Static Mesh which acts as a base and will be the root component.
- Mortar Pro Turret - It will allow the middle portion of the Mortar Gun which rotates around z axis.
- Mortar Pro Barrel - It will be the topmost static Mesh which will fire projectiles and can elevate at an angle.

Mortar Pro Pawn hierarchy
2. Actor Components
Besides the static Mesh there are 4 Actor Components
- Noise Emitter - Pawn Noise Emitter Component is used for producing sound that can be sensed by AI of MortarProPawn.
- Team Component - This component allows to determine team of a pawn. This component is a generic component can be added to any other actor.
- Health Component - Using this component can know the health of a pawn and stop shooting when it is dead. This is also a generic component that can be added to any actor.
- Aiming Component - This component contains all the logic related to firing projectile. There are three types of Aiming Component Provided
- SemiAutoAiming - This component allows to fire projectiles in semi auto manner with delay of reload seconds on each shot.
- BurstAiming - This component allows firing projectiles in burst manner.
- BeamAiming - This component allows firing projectiles in a continuous beam like manner.
Note - Both Health and Aiming Component are required if you want mortarProPawn to shoot any other actor besides mortarProPawn.
Additional Components
- HealthBar - This is a WidgetComponent that helps in showing health of Mortar Pawn.
- MortarProGenericMeshComponent - Static Mesh Component that allows pawn to add additional meshes with built in functionality for rotating along y axis and recoiling.
- MortarProTargetPointComponent - This is an empty Scene Component that allows pawn to determine the location to shoot at on a mesh.
- MortarProBulletHellManager - Version 3 includes these manager class for handling lightweight projectiles. The projectiles itself are not separate actors and are managed by these classes. The manager classes need to be manual kept in the level and its reference should be assigned in the Aiming Component. They are not to be meant to be used with BeamAimingComponent.
Changing Mesh for Mortar Pro Pawn
Plugin allows user to use their own mesh. User can create 3d models and import them in editor. But after importing user should add sockets in the Barrel Mesh Component from where the projectile will be spawned.

Mortar Pro Pawn
Setting Up Socket for Mortar Barrel Static Mesh
Whatever mesh you are using for Mortar Pro Barrel it requires a Socket from where the projectile actors would be spawned. There can be multiple sockets from where the projectile will be spawned. After adding the socket note down the name and add in the Projectiles in the Firing Section of Mortar Pro Pawn. Projectiles spawning from different sockets can be of different types and different count can be setup. In the setup provided Mortars are having two muzzles from where the projectile will be spawned so we create two Sockets with Name Projectile and Projectile1 in the static mesh window.

Socket setup in Barrel Mesh
Adding Recoil /Rotation using GenericMeshComponent
For this plugin to work we only require three meshes one for base which will be stationary, one for turret which will rotate in Z axis and one for barrel which will elevate. To have additional control there is another component provided which is MortarProGenericMeshComponent. This component allows users to rotate mesh along y axis like Minigun rotating while firing and have Recoil Effect. For Rotation there are two functions provided
StartRotation Rotates mesh with the speed setup and
StopRotation Stops Rotation with the deceleration speed
For Recoil there is a method StartRecoil which starts recoiling of mesh with the speed setup in the blueprint.
Both of these methods can be called in blueprint. In the example shared all the Blueprints of MortarProPawn BP_MortarProLaserGun BP_MortarProMissileLauncherGun BP_MortarProBombLauncher BP_MortarProBurstModeMiniGun BP_MortarProLaserBeamGun BP_MortarProFlameThrowerGun are using this component to achieve the effect mentioned above. In the example shared we use GunHolder as Barrel and two MortarProGenericMeshComponent as Left Muzzle and Right Muzzle. Socket for firing projectiles is created in Barrel Mesh itself and not muzzle.
Setting Up Health Bar
Mortar Pro Pawn is having a widget component that is setup in the blueprint. This widget allows to see the current Health of the pawn. You can change the UI based on your preference. WBP_HealthBar provides a simple health bar UI which shows the health of mortar pro pawn. In the plugin team color is also present in this widget.

Health Bar
Respawning of Pawn
Mortar Pro Pawn provides feature for respawning after Health Reaches 0. User can setup whether it wants unlimited respawning or not.
General Behavior when Health Reaches 0
- Stop Aiming Component. This will stop all the timers of firing and will call End events like FMortarProEndCoolDown ,FMortarProEndWarmup , FMortarProEndBurstFiring and FMortarProEndFiring. It will also exit from Idle state if it is in.
- Emit BPAfterDeathEvent which can be handled in Blueprint.
- If Mortar can respawn it will emit FMortarProBeginPause event that allow AI to pause logic while it respawns.
- Start Respawn after delay which is configurable using
RespawnDelay
- Emit BPOnStartRespawnEvent as soon as respawning starts. This can be handled in blueprint.
- Delay for configurable time(
AfterRespawnResumeControlDelay) after which control will be given to Mortar Pawn.
- After Delay reset TeamComponent,Health Component,Aiming Component to its default value.
- Emit FMortarProBeginResume which is handled in AI to resume AI Logic.
- Emit BPOnEndRespawnEvent which can be handled in Blueprint after respawning is complete.
- If Mortar cannot respawn because respawn count is not left then it will emit FMortarProBeginDestroyFromWorld.
Setting Up Team Component
This Component allows one to assign a team to each actor. Following are the things that can be configured using
- Team ID - Unique ID for each team,
- Team Name - Name of each team,
- Team Color - Color for each team.
- Ignore Teams ID - Teams ID that are considered Neutral. User can add multiple teams id that will be ignored.
With the help of Team Id attitude of two agents can be decided.
- Enemies - Actors with Different Team ID.
- Friends - Actors with Same Team ID
- Neutrals - Actors with
Team ID = 0
In addition to this there is an event FMortarProBeginTeamChange that is generated whenever new team id is assigned to an actor.

Team Component
Setting Up Health Component
This component is responsible for handling all the health-related functionality. This component is generic and can be added to any actor. Following things can be configured in this component
- Current Health - Current health of the actor which is clamped by MaxHealth.
- Max Health - Maximum Health that can be reached at any point in game. By default, all values are 100 units.
- Critical Health Percentage - That tells the percentage below which health is critical. A special event will be emitted here.
- Same Team Damage - This flag allows whether same team damage is allowed or not.

Health Component
General Behavior
Whenever an actor takes damage following would be the behavior of this component.
- Check if the damaging actor team is same as damager actor. If
bAvoidSameTeamDamage is true and team is same then there won't be any damage done to the actor.
- Check if it is Damage Points or Heal Points. If Damage has to be done to health it will emit FMortarProBeginHealthDecreased otherwise emit FMortarProBeginHealthIncreased
- Check if health is below critical health limit if it is then emit FMortarProBeginCriticalHealth.
- Check if health is recovering and beyond the critical health limit then emit FMortarProBeginCriticalHealthRecovery.
- Check if health has reached 0 then in that case emit FMortarProBeginDeath.
Setting Up AI Controller
To set MortarProAIController to MortarProPawn we have to set AIController in MortarProPawn Blueprint. Following things can be setup
- Adding More senses by configuring AI Perception. By Default, there are two senses configured Sight and Hearing.
- Behavior Tree and Blackboard data has to be set here.
- Target Enemies, Target Friends and Target Neutrals can be set here. By default, it is Target Enemies which means that Mortar Pawn will attack enemies. If we want to attack friends or neutral pawns then we set these flags.
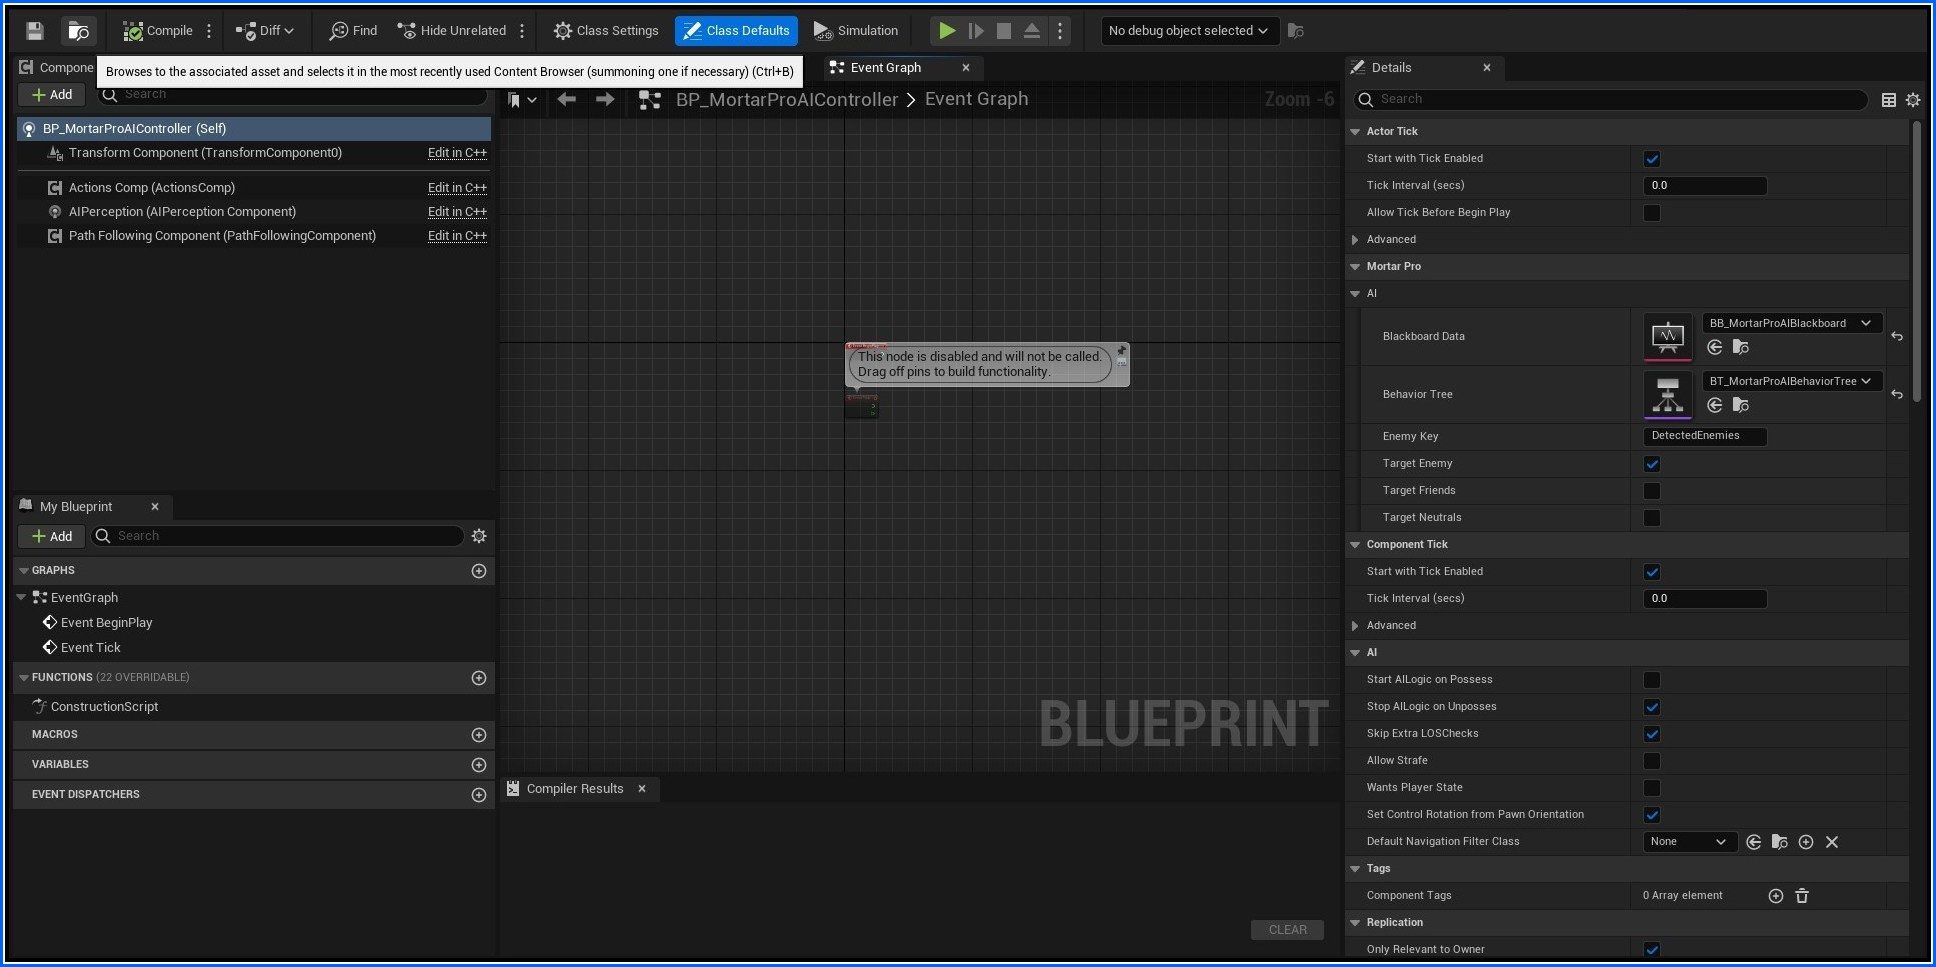
AI Setup
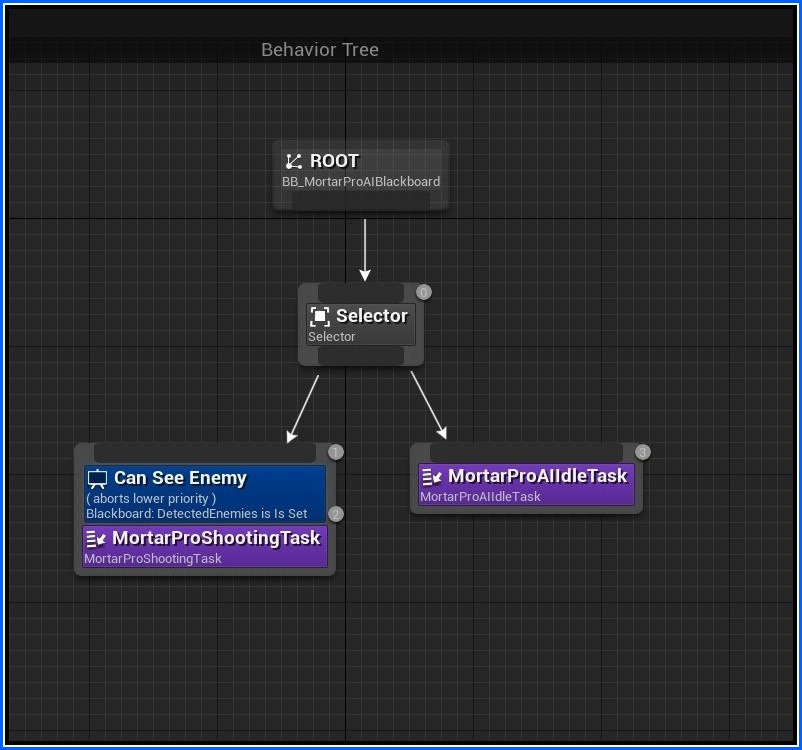
AI Behavior Tree
General Behavior
Following are the steps involved in choosing a valid target.
- AI Perception Detect actors based on the senses configured.
- Filter Detected Actor based on the attitude towards the Mortar Pawn. If
bTargetEnemy is true and the detected actor team id is different then it is a valid actor. Similarly, if we want to target Friends then bTargetFriends has to be true and to target Neutral (0 team id or team ids to ignore) we set bTargetNeutrals has to be true.
- After filtering it chooses best target and rest it keeps in secondary targets.By default, it chooses the target which is nearest to Mortar Pawn. This behavior can be changed by overriding
GetBestTarget method in blueprint. This method should return a TArray of Actors in which the actors are stored in descending order of preference, as Target. After this we check if the actor is dead or not in Behavior Tree Task.
General Behavior on Respawn
- As soon as Mortar Pawn health reaches 0 the Brain Component is paused.
- After it respawns The Brain Component is resumed.
- And after the respawn, limit is exhausted the AI Controller is detached from Mortar Pawn.
Changing Aiming Behavior
Aiming of Mortar Pro Pawn is controlled through AimingComponent. This component provides huge set of features. Aiming Component Manages Barrel and Turret. Some of the features are listed below
- Setting Projectile class for each socket or Bullet Hell Manager.
- Setting Fire count for each socket. Similarly, we can configure projectile count that can be fired from each socket location.
- Make it have unlimited ammo.
- Consider Gravity of projectiles while firing using
EnableGravity flag. This feature allows to calculate velocity considering the gravity scale of the projectile.
- Enable Prediction while shooting projectiles. This helps in shooting moving targets.
- Configure Firing Sound.
- Configure Shooting Mode and it's properties.
- Configure Vector Threshold Comparison which is a threshold limit for comparing two vectors direction.
- Events and Blueprints Functions. This component provides set of events and blueprint functions.
- Maintains Firing State in Enum which is used in different shooting modes.
General Behavior
To Fire At Location following things happen
- Exit from Idle behavior and emit FMortarProEndIdleState.
- Do Prediction while shooting moving targets if
bEnablePredictTargetPosition is true.
- Calculate Direction to fire at if gravity of projectiles is to be considered.
- Move Barrel and Turret Towards Target or Towards predicted position of target. On Starting Movement FMortarProBeginAimingMovement is emitted and when it is locked it will emit FMortarProEndAimingMovement once. These events can be handled in blueprint.
- Call Fire method which is overridden in semi auto shooting and burst shooting. This allows users to add more shooting modes.
- Aiming Component will ask MortarPoolSubsystem to return Projectile based on the class mentioned which will spawn or reuse the projectile. Aiming Component will set random spread and velocity in case of gravity enabled projectiles.
- Whenever a projectile is spawned it goes into the pool to limit the number of projectiles that exists in a level.
Version 3 Bullet Hell Update
- Version 3 allows usage of Bullet Hell Manager. The Aiming Component requests BulletHellManager to spawn a light weight Bullet Hell Projectile . Please note these are not separate actors.
- Call FMortarProBeginFire and emit sound after spawning projectile.
General Behavior on idle task
Whenever there is no target following is the behavior of Mortar Pro Pawn.
- Stop Firing Timers if any
- Emit FMortarProEndFiring to indicate that firing has been stopped.
- Wait for predefined amount of time
InitialIdleEventDelay.
- Emit FMortarProBeginIdleState telling that idle state has begun.
- Move Barrel and Turret at Initial Location.
Changing Shooting Mode
As Mentioned above there are three modes provided in the plugin that can be used for firing projectiles. Modes can be changed by changing the class of Aiming Component in Blueprint.
Semi Auto Aiming Component
This mode allows projectiles to fire in semi auto manner meaning one by one with a constant delay of reload time. This mode maintains following Firing State -
- OutOfAmmo - Whenever there is no ammo left. This is the state that it goes into.
- Reloading - Whenever gun is reloading, we go into reloading state.
- Aiming - When Mortar Pro pawn is aligning itself to aim at target.
- Locked - When Mortar Pro pawn has aligned itself and is ready to fire at target. Firing happens only when it is locked.
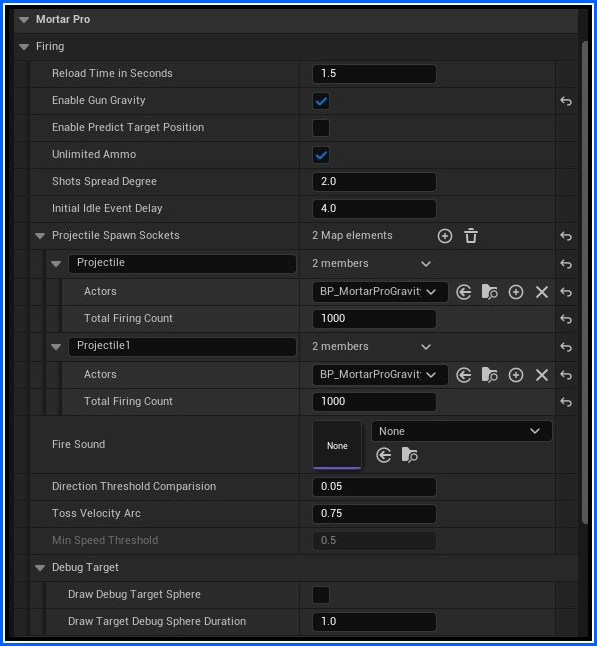
Semi Automatic Aiming Component Properties
Burst Aiming Component
This shooting component allows to achieve behavior of Burst firing. This component allows to configure
- Burst Fire Rate - How Fast is Burst firing per min?
- Burst Fire Duration - Duration of Burst firing
- Cool Down Timer Rate - How Fast cooling of weapon should happen.
- Cool Down Duration - How much it will take to cooldown a mortar pro after it is fully heated.
Note - Bullet Hell Manager Projectiles cannot be used with this component
General Behavior for burst firing
- Before firing we check if the weapon is not fully heated and is locked at target along with other basic checks.
- Before going in burst shooting, it goes in warmup or preparation state and emit FMortarProBeginWarmup.
- After initial delay it goes out of warm up state and emit FMortarProEndWarmup. This event states that Mortar Pro has prepared for firing and is ready to go brrrrrrrrrrr i.e fire.
- It emits FMortarProBeginBurstFiring when goes in burst round and emits FMortarProEndBurstFiring when the round has been completed.
- Round can end due to various reasons like
- Target has moved.
- Target has died.
- No Ammo left.
- Gun is fully Heated.
- If a Gun has become heated it goes in cooldown state automatically. When number of projectiles that can be fired in a burst round exceed
TotalFireCountAllowedBeforeHeating the guns become fully heated and it won't be able to fire until it cools down fully. If the gun is not fully heated it can still fire.
- Mortar Pro Pawn will try to cooldown for duration mentioned in
CoolDownDurationInSec. When cooldown is about to start it emits FMortarProBeginCoolDown and when cooldown stops it will emit FMortarProEndCoolDown. FMortarProEndCoolDown can be emitted when cooldown is fully completed or when the mortar pro pawn goes again into firing without fully recovery from heating. If Weapon is fully recovered it will call BPWeaponFullyRecoveredFromHeating which is a blueprint implementable function that can be handled in blueprint.
- Whenever it sees it is not burst firing it will go in Cooldown state.
- It maintains following firing states.
- OutOfAmmo - If No ammo is left.
- Aiming - If Turret and Barrel are moving to target
- BurstShootingCoolDown - If it is currently cooling down.
- BurstShootingBurstFiring - When Mortar Pro Pawn is firing a burst round.
- Locked - If mortar Pro pawn is locked and ready to fire at target
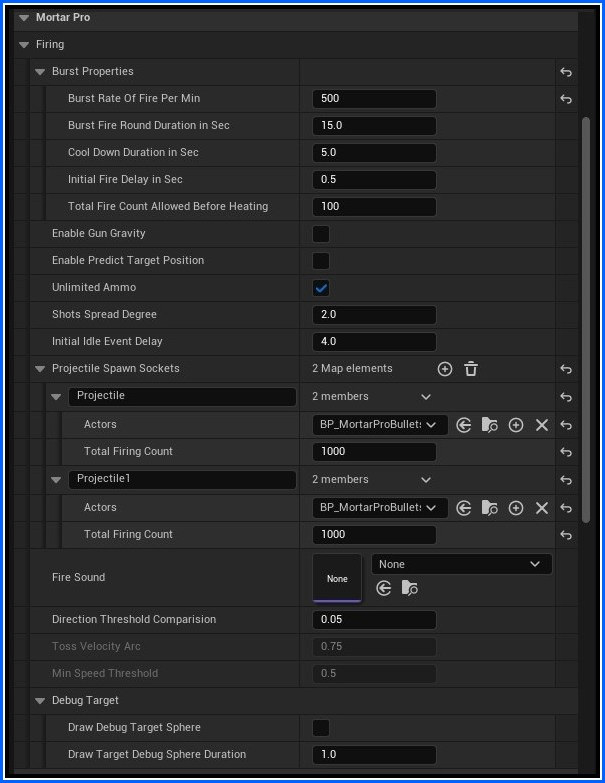
Burst Aiming Component Properties
More shooting modes can be added by inheriting from MortarProAimingComponent. Following is the flow chart describe how a projectile is used by MortarProAimingComponent. 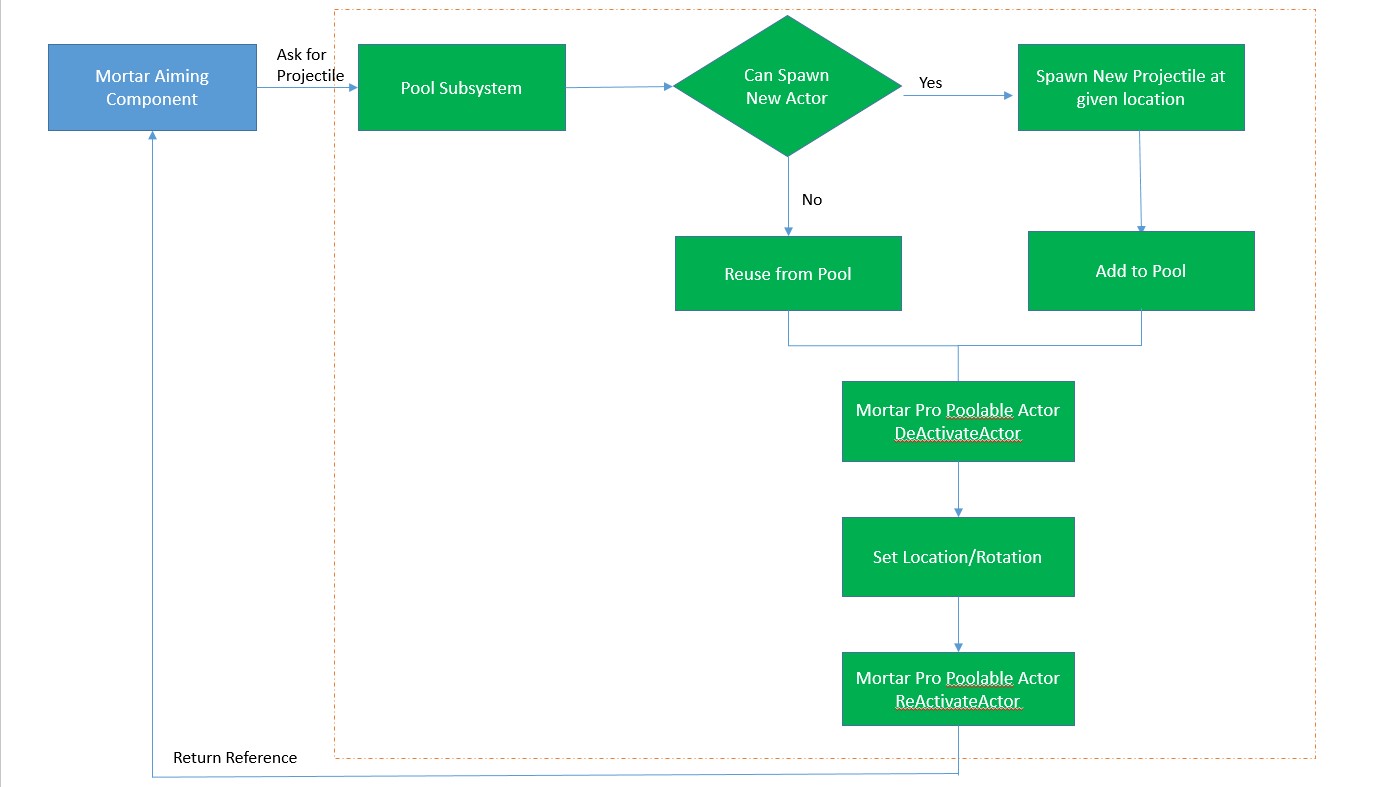
Beam Aiming Component
This shooting component allows to achieve behavior of Beam Like Firing which is continuous like a laser beam or a flamethrower.
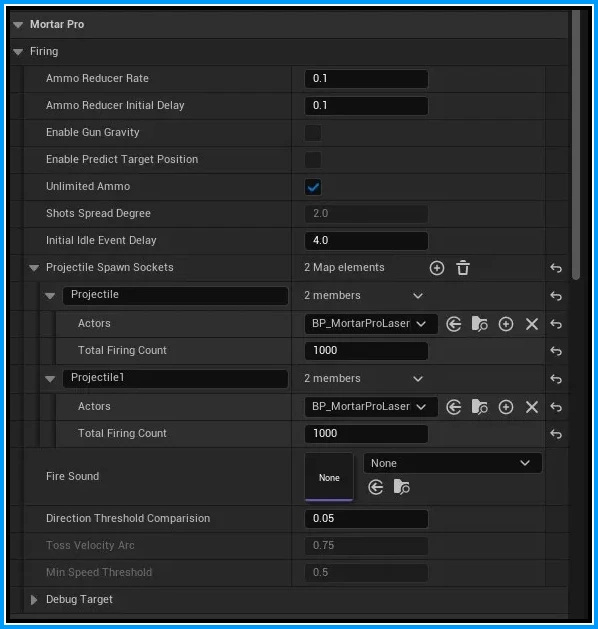
Beam Aiming Component Properties
General Behavior for Beam firing
- Before firing we check if the weapon if the weapon has ammo in any socket and if the gun is in locked state.
- After checking the gun starts firing a continuous beam by spawning a single projectile.The projectile is never deactivated until and unless the gun stops firing.
- The Gun is set in Beam Firing state and ammo is reduced in a timely manner.
- If the Gun ammo has been exhausted or the gun has started moving or the target/owner is dead then the Beam Projectile will also gets deactivated by Using EndFiring Delegegate.
- In addition to OutOfAmmo,Aiming and Locked state this component also has Beam Firing State which is set as soon as the gun is firing a beam.
Changing Projectiles
As mentioned, there are three classes of projectiles (line traced , Beam and physical projectiles). All of them are child classes of MortarProBaseProjectile.
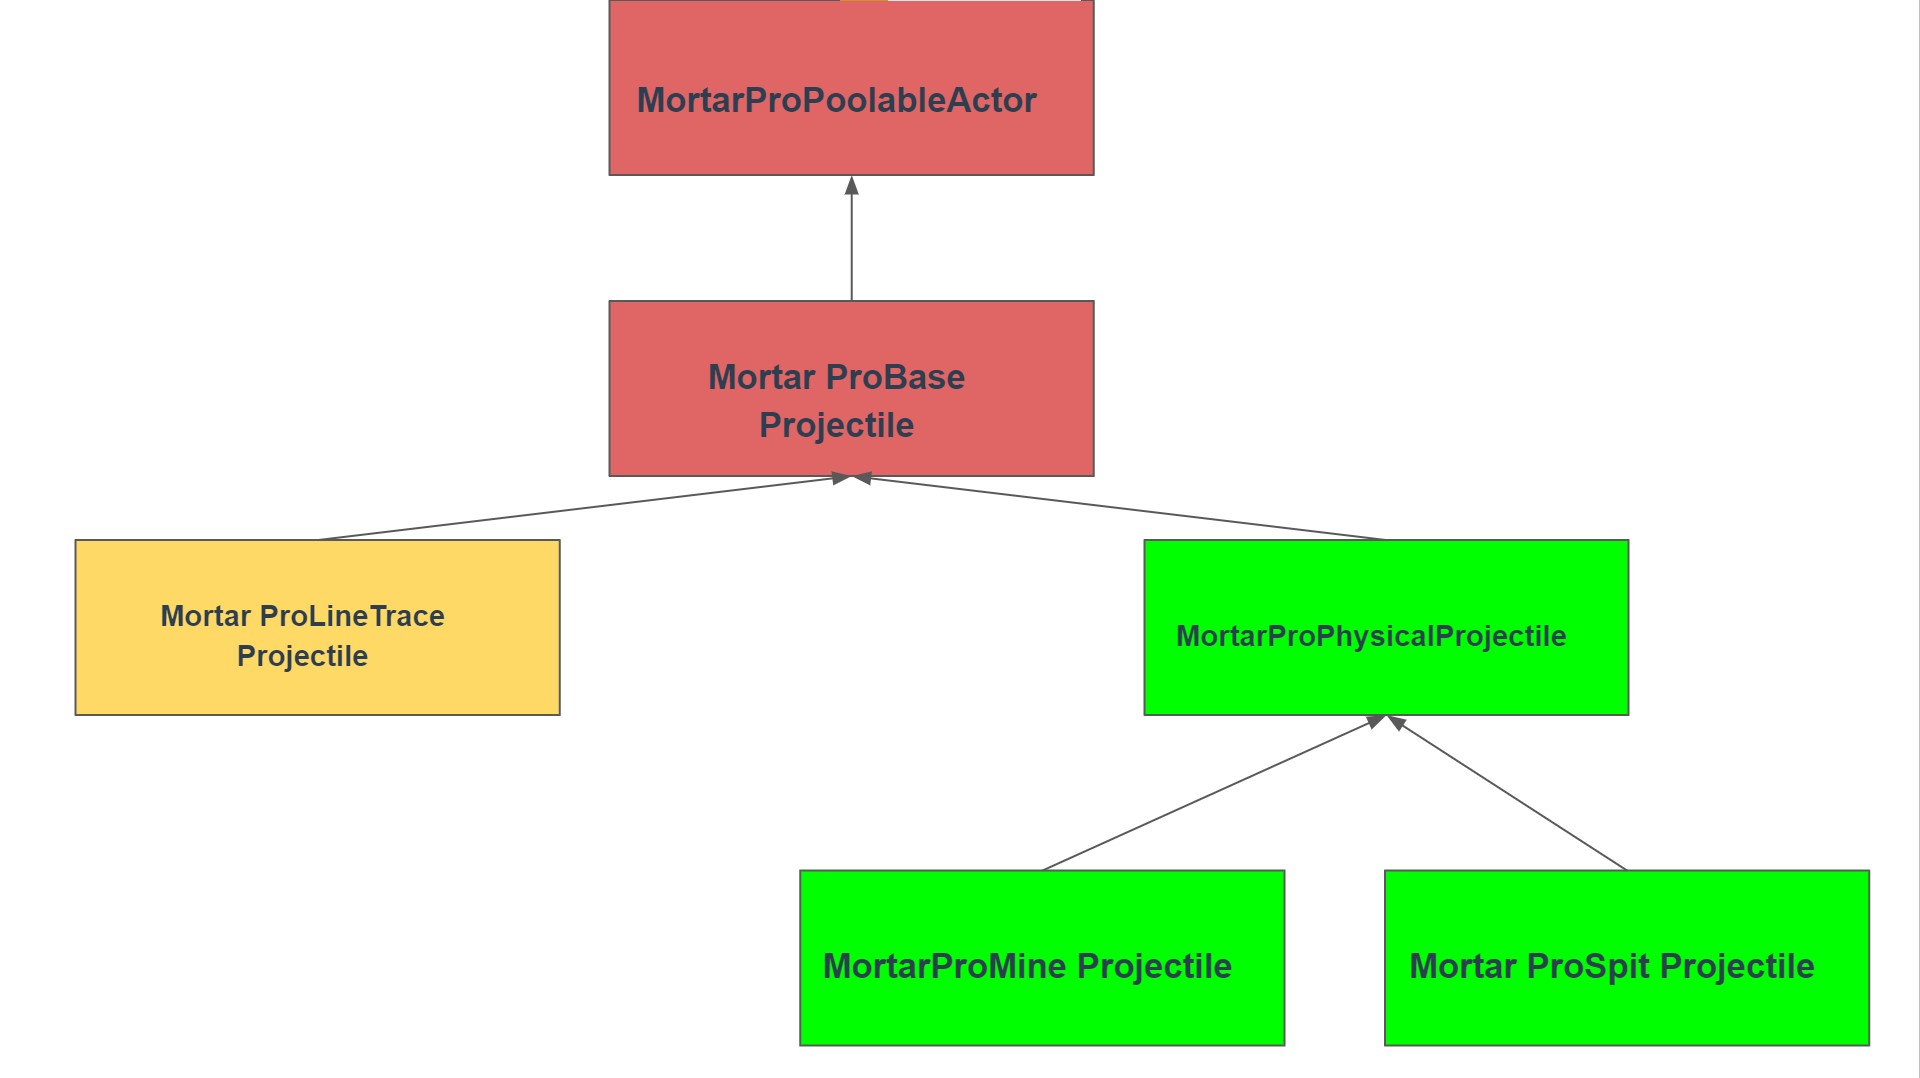
Projectiles Type
Functionalities of MortarProBaseProjectile are
- Setting Projectile Damage per surface.
- Niagara Hit Impact for Each Surface Type.
- Sound Effect for Each Surface Type.

Projectiles
MortarProLineTraceProjectile
This is a class of projectile that doesn't contain movement logic and uses line trace to hit the target. This class of projectiles doesn't have projectile movement and should be used where we don't require physical actors like in case of bullets. In this class of projectiles, we can set
- Line Trace Speed. Although we cannot set the speed of line trace but by using this, we calculate time to hit a target using distance formula, and do a line trace after calculated time.
MortarProBeamProjectile
This is a class of projectile that is meant to be used in Beam Aiming Component. Only one instance of a projectile is spawned for a full firing cycle i.e. it never gets deactivated unless the gun is moving, owner/target is dead or ammo has been depleted. It does box trace if the beam projectile is meant to be used for hitting a single target or multiple line traces if it is meant to be used to hit multiple targets like in the case of a flamethrower. This class of projectiles doesn't have projectile movement as well. Users can set
- DamageRate - Damage rate of the projectile.
- BeamMaxReachXOffset - Limit the distance of the trace like in case of flamethrower it will have a certain limit in forward direction.
- InitialDelayBeforeDamage - Initial Delay Before doing damage.
- EnableMultipleHits - If multiple hits should be considered like in case of a flame thrower. If enabled then it will do 7 line traces. The Starting points of Line traces or Box traces are based on BeamTraceReference. In the case of multiple line traces, the starting point is on each corner of the front face of this volume, which is 4 plus one from the middle and two in between.
Initially BPBeamStart is emitted which represent start and end position of beam then whenever a beam starting or ending position is changed BPBeamPositionChanged is called which is a blueprint implementable function in which we can modify beam position for Niagara VFX.
MortarProPhysicalProjectile
This is the base class for physical based projectiles. Following are the functionalities provided In addition to the functionalities provided by MortarProBaseProjectile -
- Niagara Launch and Trail Effect.
Homing Projectile whether to follow the target or not. User can set Min and Max Acceleration to use for Homing Projectiles.
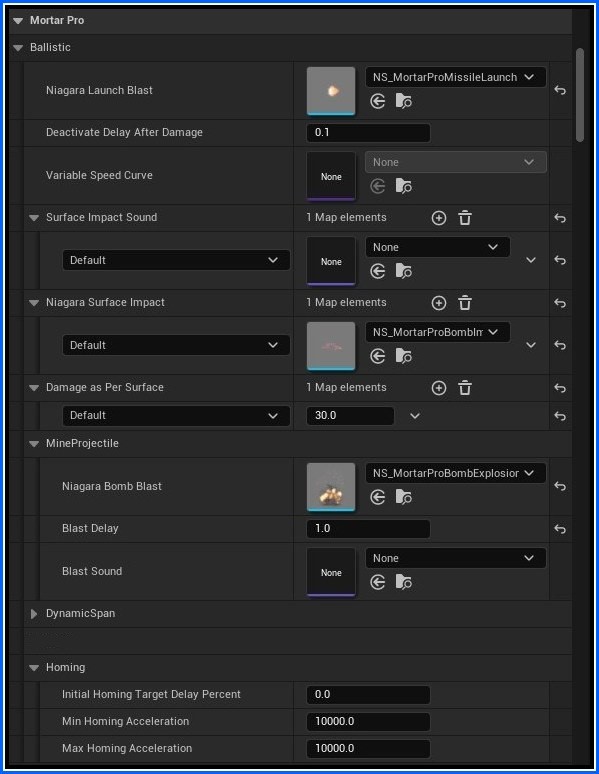
Projectile Properties
Changing Speed of projectile
User can change projectile by changing InitialSpeed and MaxSpeed of ProjectileMovementComponent or to have more control of projectile the plugin offers a way to change speed of projectile dynamically with the help of CurveFloat The Curve allows setting projectile speed with respect to time.
Please note in case of gravity (Gravity Scale > 0) Speed is calculated using AimingComponent and so there is no effect of changing InitialSpeed,Max Speed or Curve
General Behavior on hitting a target
- Fire Niagara Hit Impact and Sound based on Surface
- Fire Explosion Impulse.
- Emit BPOnImpactEvent which is a blueprint event that can be
handled in blueprint.
- Do Radial Damage to actor based on the surface type
- Deactivate projectile.
Aggregated Tick of Projectile Movement Component
In MortarProPhysicalProjectile,MortarProProjectileMovement is type of ProjectileMovementComponent. Using the custom projectile movement component, we are able to use concept of aggregate ticking(https://www.youtube.com/watch?reload=9&v=CBP5bpwkO54) for projectile movement with the help of MortarProAggregateTickSubsystem. This helps in optimizing performance for physical based projectiles.
MortarProMineProjectile
This is a subclass of MortarProPhysicalProjectile which has all the above features. This class of projectiles is mainly to replicate behavior of mines that blast after some delay. In addition to above features following are the features provided -
- Gravity - This allows to set gravity for a projectile which can be set through blueprint using gravity scale.
- Blast Delay - Delay after which projectile will blast and cause damage.

Projectile Hierarchy
General Behavior on hitting a target
- Fire Niagara Hit Impact and Sound based on Surface
- Emit BPOnImpactEvent which is a blueprint event that can be handled in blueprint.
- Check Whether to damage same team or not.
- Start Blast Timer with the delay configured in blueprint.
- Spawn Niagara Blast system.
- Emit Blast Sound.
- Call BPExplosionEvent which is a blueprint implementable function that can be handled in blueprint.
- Damage actor Do Radial Damage to actor based on surface.
- Deactivate projectile.
MortarProSplitProjectile
This is a subclass of MortarProProjectile which has all the features of MortarProProjectile . This class of projectiles helps in achieving effect of splitting projectile to hit multiple targets. Following are the extra features provided
- Setting Number of Projectiles to split into.
- Setting Class of child projectiles that will be spawned from parent projectile.
General Behavior when Projectile is spawned
- Calculate Delay based on target position and after delay split projectiles into
SplitProjectilesCount. The Delay Depends upon the PercentTimeToSplitProjectile . This variable tells at what percentage of target distance the projectile will be split into. If set to 50 then this means projectile will split in midway of target.
- Do a sphere trace and get targets.
- Emit
BPBeforeProjectileSplit function that can be handled in Blueprint and Get Projectile of class mentioned in blueprint from MortarPoolSubsystem.
- Note the splitting can happen only for one level.
Configuring Bullet Hell
Version 3 includes Bullet Hell features that allow light weight projectiles which can be used whenever there is requirement of substantial amount of projectiles(100+) to be active at a single time. These projectiles are managed by BulletHellManager Classes .
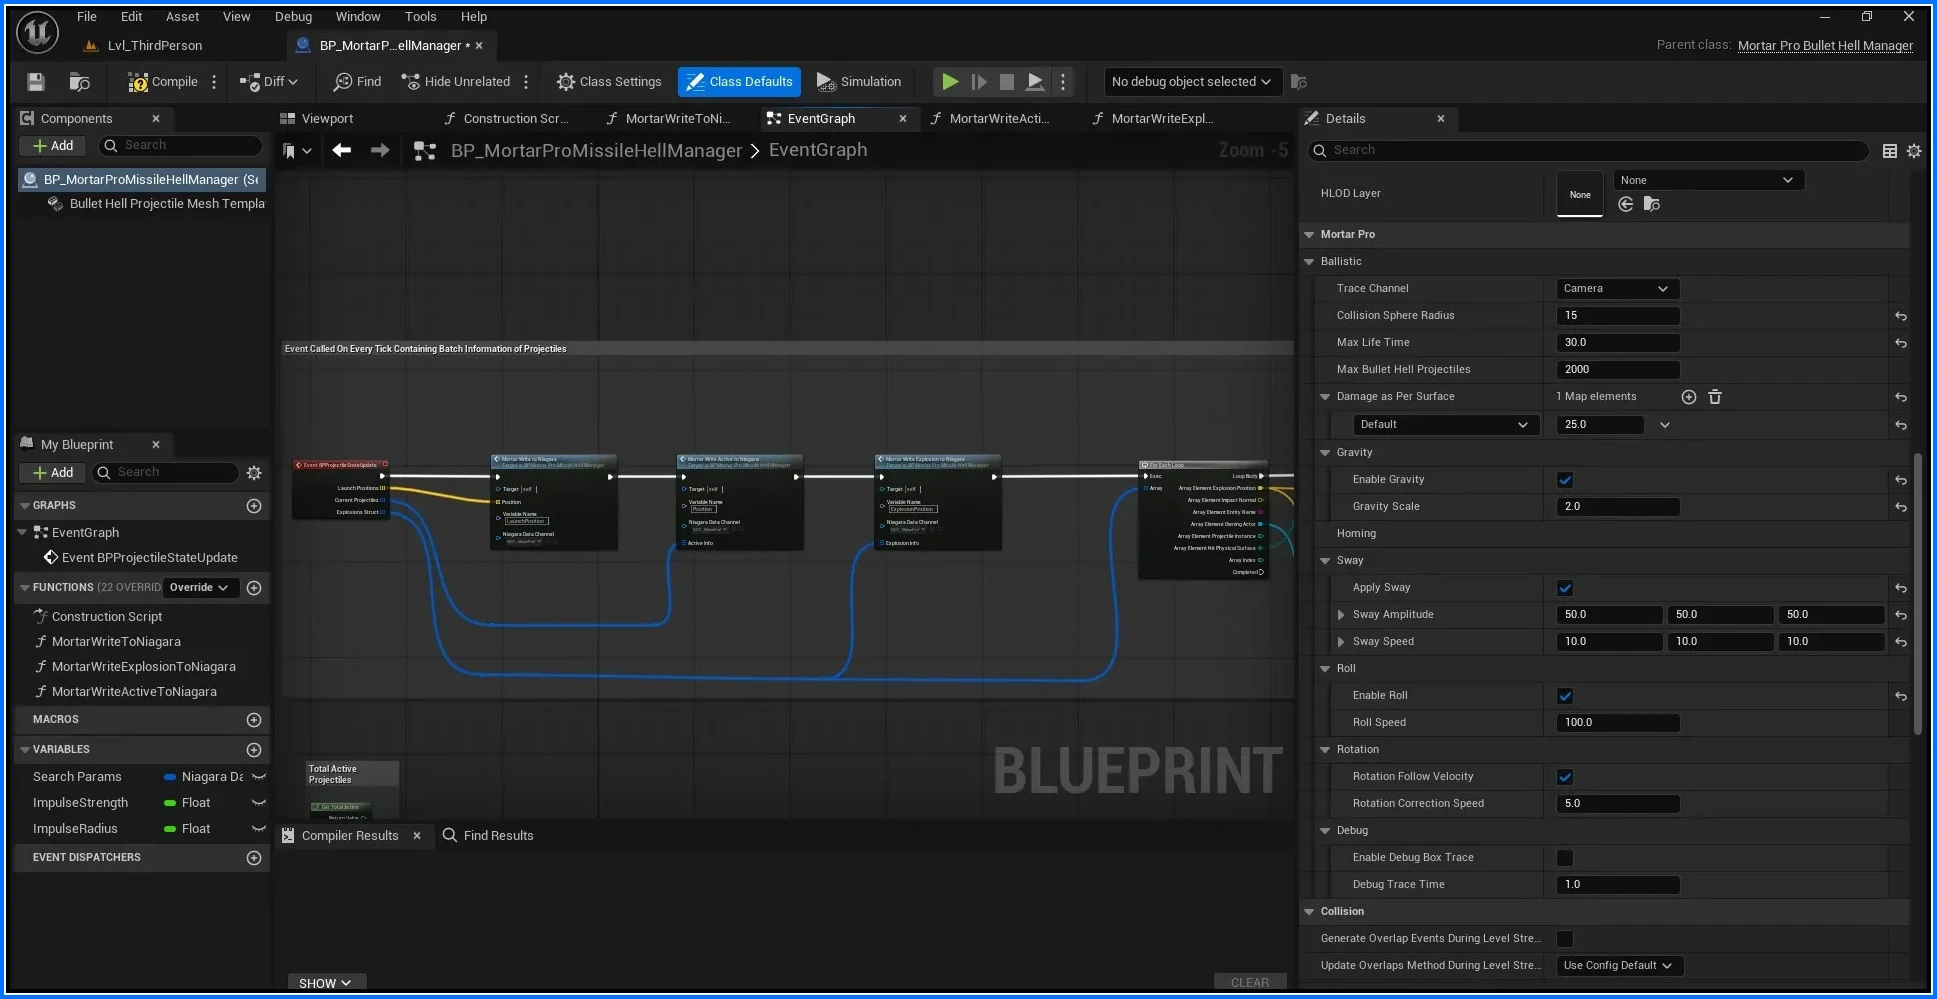
Bullet Hell Manager Properties
There are three BP provided(**/All/Plugins/MortarProPlugin/Projectiles/Blueprints/BulletHell**)
- BP_MortarProMissileHellManager - These manages lightweight homing rocket projectiles.
- BP_MortarProLaserHellManager - These manages lightweight laser projectiles.
- BP_MortarProBombHellManager - These manages lightweight gravity based projectiles.
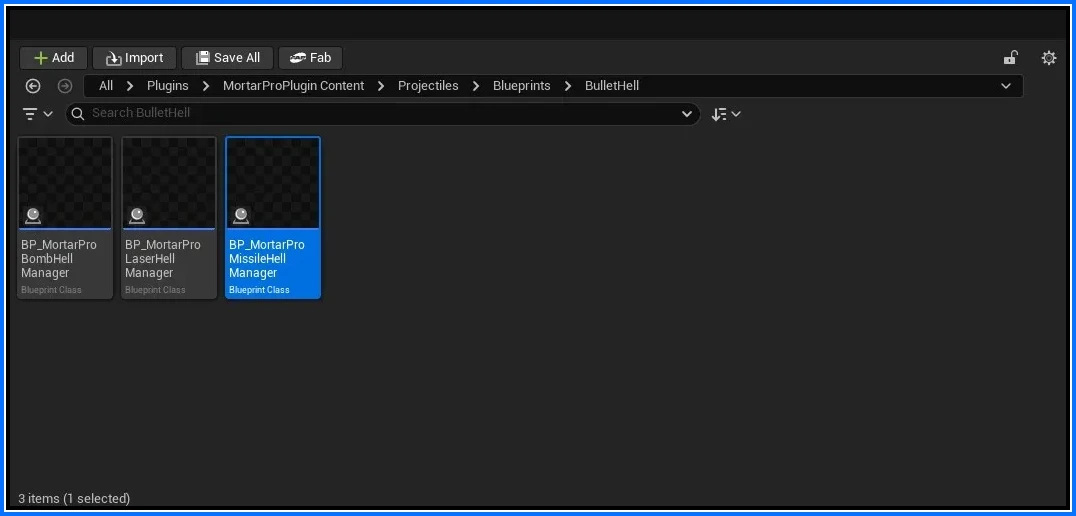
Hell Managers
For Usage
- Check Enable Bullet Hell in Aiming Component(Cannot be used with Beam Aiming Component)
- Drop the Blueprint Derived from the Bullet Hell Manager into the level.
- Select the object reference in the Projectile class in AimingComponent
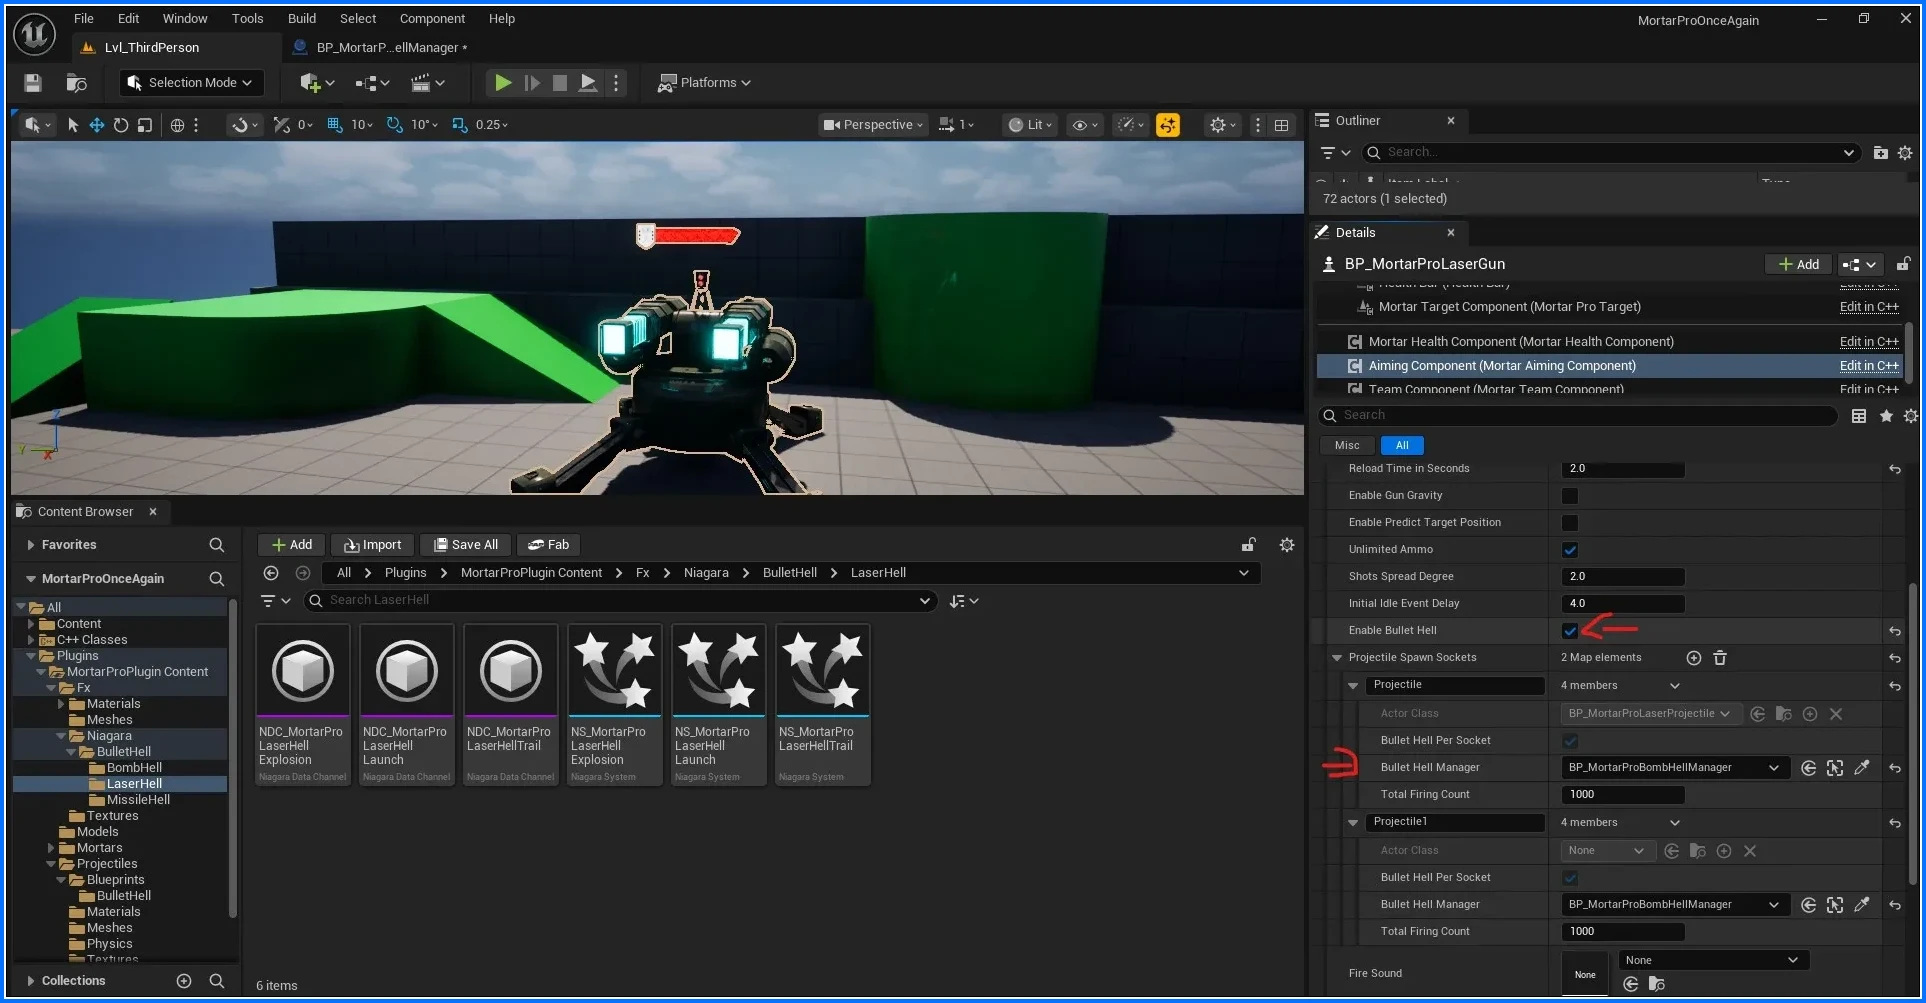
Configure the Max No of Projectiles in the Blueprint.
- For other features Customize the Blueprint to your preferences, such as Homing Missiles, Homing Strength, Gravity Projectiles, Sway Amplitude, and more. These features are designed to replicate the functionality of the Projectile Movement Component, while maintaining optimal performance.
- Instead of Static Mesh Bullet Hell Manager uses Instanced Static Mesh Component
- Bullet Hell Manager uses Niagara Data channels for pushing the updates of Projectile Instance
State of Bullet Hell Projectile Instance
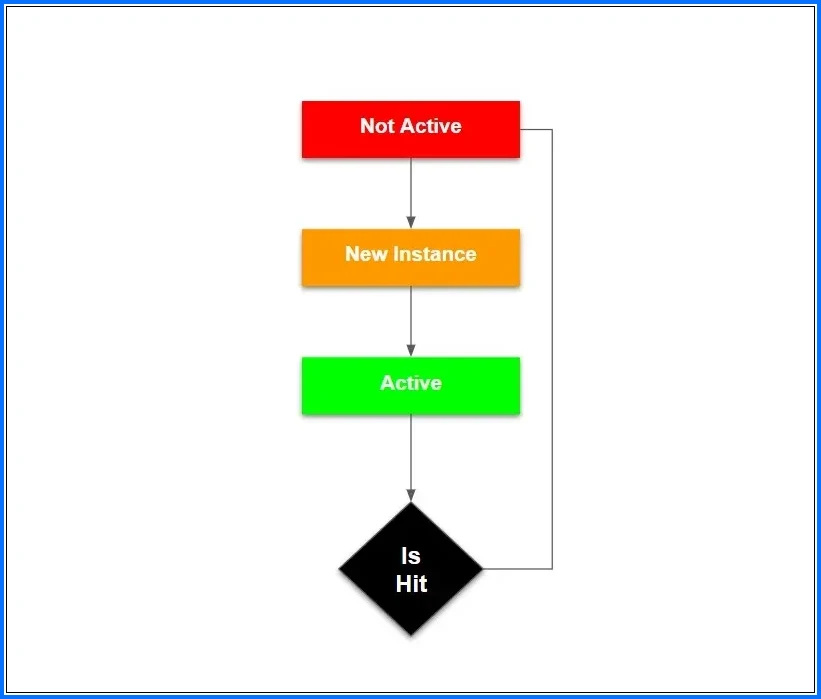
Hell Manager State
Initially the projectile instance is NotActive and ready for usage. As soon as it is spawned its status is changed to NewInstance. The position of new instance is passed to BP function as well to spawn Launch Effects. After that its status changes to Active and when it is hit its status again changes to NotActive for reuse.
General Behavior of Bullet Hell Manager
- Aiming Component Requests Bullet Hell Manager to spawn a bullet hell instance.
- Bullet Hell Manager picks the not Active Projectile and reuses the projectile Instance.
- It marks the state to be active.
- In the tick it loops through all the active projectiles and does physics calculation like Acceleration calculation, speed and position calculation and updates the position of ISM.
- At the end of the loop it pushes the update to a BP function BPProjectileStateUpdate containing Array of FMortarProBulletHellActiveInfo containing position,velocity and rotation of the active projectile, Array of Launch positions for new projectile instances and array of explosion struct FMortarProBulletHellExplosionInfo containing explosion position and other explosion related information. In the blueprint function the updates are pushed to Niagara Data Channels which write to global Niagara System.
- In the Blueprint Function Damage and impulse is applied to the hit actor.
Changing Bullet Hell Niagara Data Channel
Bullet Hell Manager writes the updated positions to the Niagara Data Channels. For each Bullet Hell Manager three Niagara Data Channels are used
- Niagara Data Channel for Updated Position - In this channel the updated position is pushed of the active Projectile. It uses Position variable Name.
- Niagara Data Channel for Launch Position - In this channel the Launch position is pushed of the new Projectiles. It uses LaunchPosition variable Name
- Niagara Data Channel for Explosion Position - In this channel the Explosion position is pushed of the Projectiles that hit something. It uses ExplosionPosition variable Name
Following are the Niagara Data Channels present in the plugin **/All/Plugins/MortarProPlugin/Fx/Niagara/BulletHell**
- NDC_MortarProMissileHellTrail - For Missile Trail
- NDC_MortarProMissileHellLaunch - For Launch Effect
- NDC_MortarProMissileHellExplosion - For Explosion
- NDC_MortarProLaserHellTrail - For Trail of Laser Projectile Hell
- NDC_MortarProLaserHellLaunch - For Launch Effect of Laser projectile
- NDC_MortarProLaserHellExplosion - For Explosion of Laser
- NDC_MortarProBombHellExplosion - For Explosion of Gravity Bomb.
Bullet Hell Niagara Effects
As mentioned earlier Bullet Hell uses global Niagara system instead of spawning Niagara effect on each hit or spawn. Present in **/All/Plugins/MortarProPlugin/Fx/Niagara/BulletHell**
- NS_MortarProMissileHellTrail - For Missile Trail
- NS_MortarProMissileHellLaunch - For Launch Effect.
- NS_MortarProMissileHellExplosion - For Explosion
- NS_MortarProLaserHellTrail - For Trail of Laser Projectile Hell
- NS_MortarProLaserHellLaunch - For Launch Effect of Laser projectile
- NS_MortarProLaserHellExplosion - For Explosion of Laser
- NS_MortarProBombHellExplosion - For Explosion of Gravity Bomb.
Properties of MortarProPoolableActor
As mentioned above MortarProPoolableActor is a generic class that provides functionalities for Deactivation and Reactivation. This class of actor never gets destroyed but instead gets Deactivated when it is supposed to be destroyed and ReActivated when it is supposed to be spawned.
General Behavior on DeActivateActor
- Disable Components.
- Emit FMortarProActorDeactivated.
- Clear Any Timers.
Just Like Lifespan, user can set a Deactivate span after which the actor will be deactivated from world. Instead of Destroying user should call DeActivateActor function.
General Behavior on ReActivateActor
- Call InitializeBeforeSpawnParam for initializing variables.
- Enable Components.
- Start Timers.
- Emit FMortarProActorActivated.
These functions are virtual functions and are overridden in child classes.
Lifecycle of MortarProPoolableActor
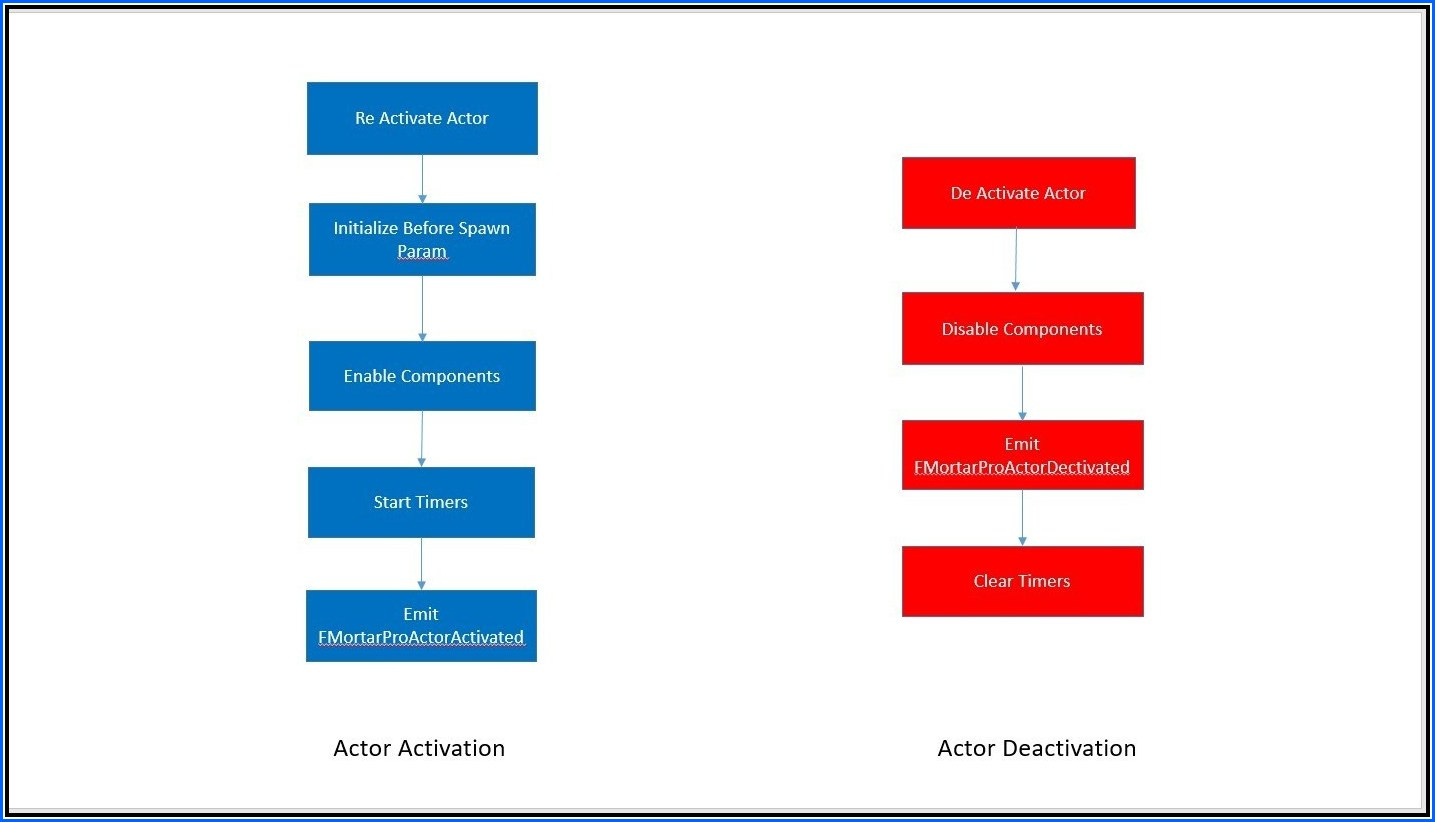
Lifecycle
Managing Projectiles via Pool
Plugin Provides Pool Subsytem (MortarProPoolSubsystem) for managing Projectile spawned. This subsystem controls how many projectiles will be present in a level based on the limit we have set in BP_MortarProPoolManager.
Following is the flow
- Aiming Component Ask Pool Subsystem to get a projectile actor.
- Pool Subsystem will check whether it can spawn new projectile and if not then it will reuse the projectiles present in level.
- If new projectile is spawned then it adds to the pool queue.
- After that pool subsystem calls DeActivate on MortarProPoolableActor.
- After Deactivation it will set the location, rotation and owner.
- Then the Projectile actor is ReActivated which enables that actor in a level.
- Although the actor is not supposed to be destroyed but if it destroyed then it is removed from pool queue.
User can use their own classes for projectiles which don't derive from MortarProPoolableActor but then they won't have functionality for ReActivation and Deactivation so the user have to implement their own code for hiding and unhiding the meshes and components.
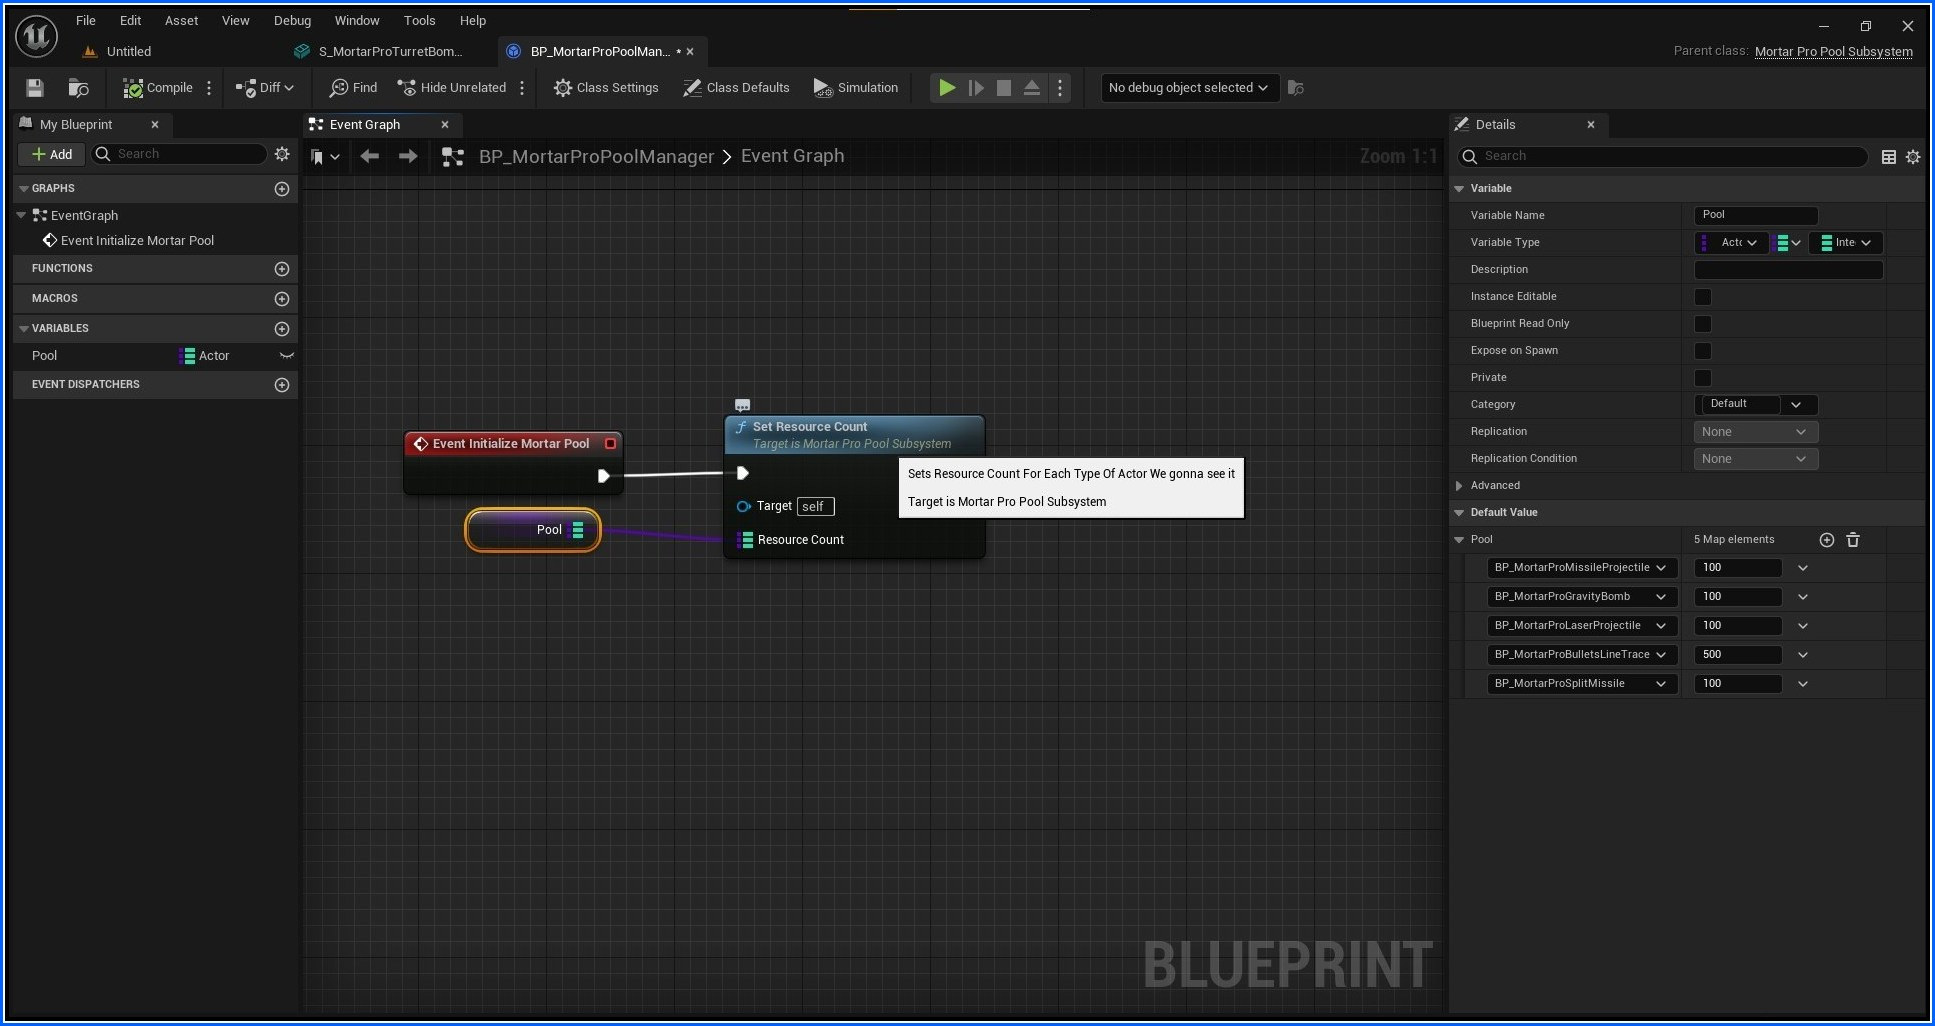
Setting up Pool
Setting up Significance Manager for more performance Benefit
With Version 2 the plugin comes with significance Manager(https://docs.unrealengine.com/5.3/en-US/significance-manager-in-unreal-engine/) . Using the Significance Manager we can manage the tick rate of Projectile Movement of MortarProPhysical Projectile based on Significance Value that we can configure in blueprint.Each MortarProPhysicalProjectile has SignificanceComponent. To use it enable Manage Significance in SignificanceComponent. 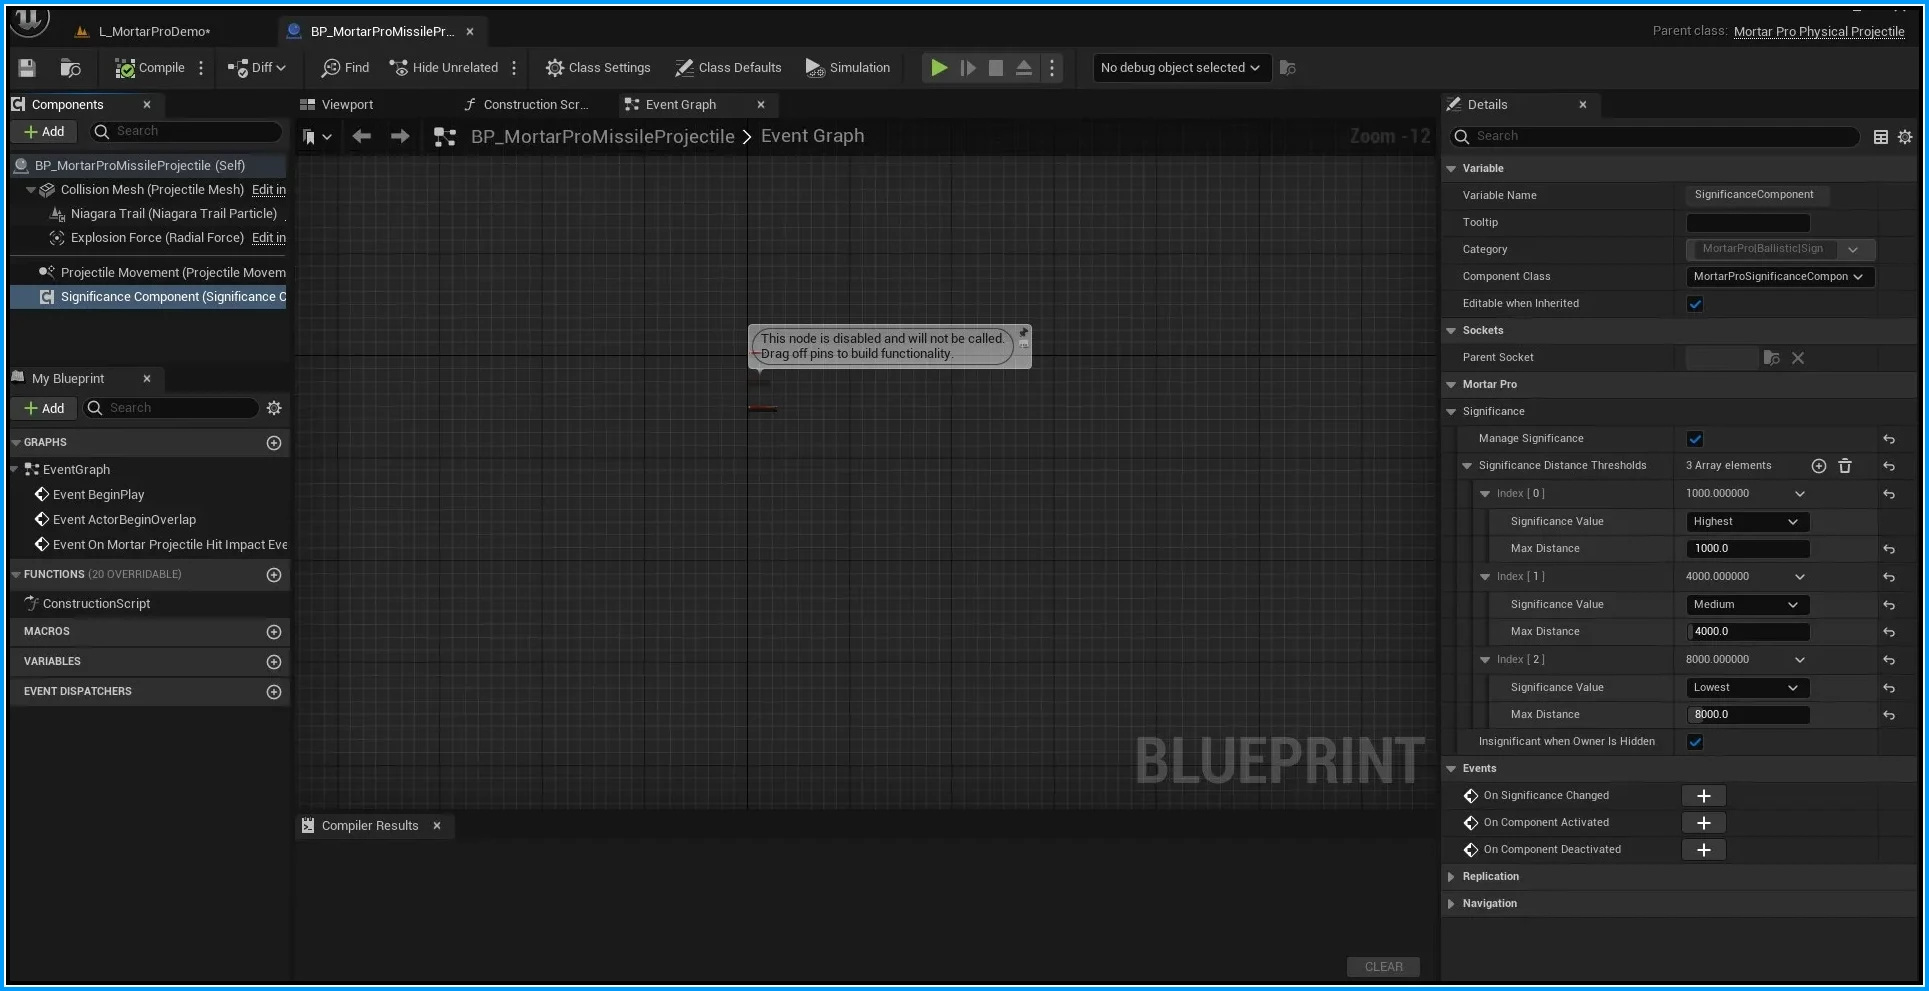 There are four values
- Highest - This is the significance value at which we consider the object is nearest and normally we want the tick rate to function without any delay.
- Medium - This is further than Highest Significance Value. Here we reduce the tick rate.
- Lowest - When Projectile is farthest and here we will further reduce tick rate.
- Hidden - When Projectile is hidden.
Steps To Configure Significance Manager
- Ensure Significance Manager is enabled in Plugin window.
- Configure Distance for each Significance Value in SignificanceComponent.
- Configure Tick Rate for each significance Value in Mortar Pro Physical Projectile Blueprint.
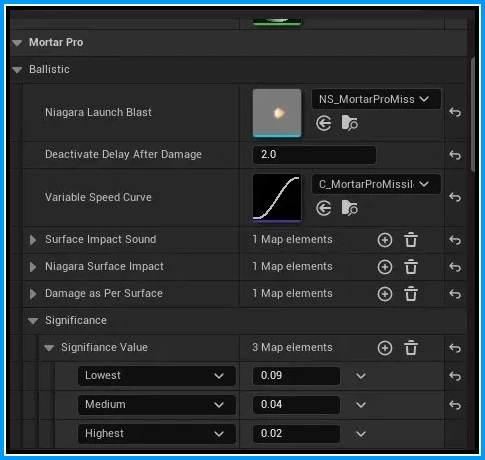
Significance Value Tick
- Now Whenever significance value is changed On Significance Changed is called. Here we can configure tick rate and also disable effects based on significance value.
- Set Game Viewport Client Class in Edit->Project Settings->Engine->General Settings->Game Viewport Client Class to MortarProViewportClient.
For example if we set Max Distance to 1000 for Highest Significance Value and 3000 for Medium Significance then from 0 to 1000 units from view port the significance Value is Highest and beyond that till 3000 the significance Value is Medium.
Debugging
Plugin Provides visual debugging to get more sense of how is Mortar Pro Plugin is working. All Debugging parameters are present in Debug Category of Blueprints. Besides Visual debugging,plugin also does logging of most of the tasks. To Enable Verbose logging add following lines in DefaultEngine.ini. [Core.Log] LogMortarProPlugin=All
The General syntax of logging is [Module][Function_Name][Actor Name] Message
Debugging Detected Valid Targets
To Enable Priority of Target Actors. Enable DrawDebugTargetsText Debug Flag in Mortar Pro Pawn Blueprint.
Debugging Current Target
To Enable what location the Plugin is shooting at. Enable DrawDebugTargetSphere in AimingComponent.
Debugging Line Trace of Line Trace Projectile
To Enable line trace visually for Line Trace Projectiles we enable via EnableDebugTargetLineTrace in Blueprint of MortarProLineTraceProjectile.
Debugging Secondary Targets for Split Projectile
To Enable debug sphere for secondary targets in case of split projectile we enable DrawTargetDebugSphere parameter in blueprint.
Debugging Child Projectiles spawned for Secondary Targets for Split Projectile
To Enable debug sphere at location of spawning of child projectiles for secondary targets in case of split projectile we enable DrawSpawnDebugSphere parameter in blueprint.
For documentation related to code,follow this link


 There are four values